Monday, 28 February 2011

Pylon Symmetry

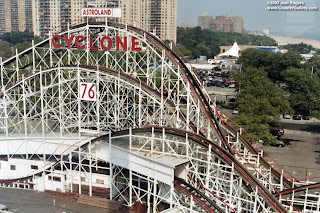
Looking at this photograph, taken from underneath the pylon. It is easy to see
the symmetry and repeat involved in its structure.
Inspired by this I have decided to develop my final outcome around this image
and have experimented with ways to attach the pleated pieces together.


Here I have stapled the individual pleated panels together before threading
string through the top sections of the pleats.


When the string is pulled tight the top of the panels gather to create a
3D structure, which I am going to go on to experiment with ways
of layering two or three of these pieces on top of each other.


Development of ideas

Still working around the theme of electricity pylons I have experimented more
with the cut-out pleated technique. Gathering the pleats at one end, which I think gives the form of an electricity pylon. 
I have also changed my paper type and I think the grey stock
gives a industrial, metallic feel to this piece.


Friday, 25 February 2011

Structure Research

Experimenting with the cut-out pleated style I worked on in the workshop
led me to look at the structure of electricity pylons which is based on repetition
and symmetry.


I then went to look at how this simple structure creates strength whilst appearing
fairly delicate and is used in old-fashioned roller coasters and ferris wheels.


Pylon Primary Research...

This is a picture I took of a pylon in the field behind my house. I find the structure of the pylons interesting, how they don't appear that strong because they don't have a solid structure yet the way the angles at which the metal is joined gives it strength.


When viewed from a distance the pylon appears faint.


Saturday, 5 February 2011

Richard Sweeney Paper Workshop 2


In this piece I continued my experimentation with texture and cutout.
I creased the paper to create different sized rectangles and cut out randomly chosen areas before scoring curves lines and folding the paper.


I think that this structure resembles a shell. I started experimenting with scoring curved lines in the paper to create folds. I particularly like the way that manipulating the paper in this way has created highlights along the edges of the folds.


Here I started working on a pleating technique demonstrated by Richard Sweeney.
I found that this way of folding creates strength in the paper, making it easier to produce structural pieces.


I then went on to cut out each section of the pleats making the piece more delicate and creating a netted effect. I plan to experiment with and develop this technique, perhaps combining it with other types of folding.


Julien Vallee


'Spray Can'
created for the Illustrative Zurich Festival (2008)

Jen Stark

The artist Jen Stark works with stacked paper, cutting into the layers to create 3d 
sculptural pieces.
The geometric nature and vivid multicolours of her work creates a kaleidoscope effect and I would like to experiment with using different colour stock in my own work.
'Coriolis Effect'
(hand-cut paper on wood backing, 2007)

'Sunken Sediment'
(hand-cut paper and foam core, 2010)


'Papermation' stop-motion

Tuesday, 1 February 2011

Richard Sweeney Paper Workshop

Here are some paper sculptures I produced during the Richard Sweeney paper work shop.
All are made from identical pieces of white paper and I've used different techniques to create different effects.


I used creasing to soften the paper, making it easier to manipulate.
It also allowed the paper to form curves by itself which creates interesting results.


Here i have increased the size of the squares which made the paper bend in a more angular way, creating sharp edges.


Here I have experimented with cutting out areas of the creased grid, allowing light to shine into the interior of the piece.


After the workshop I went on to experiment with creasing in diagonal lines, creating a lattice effect.
This made the paper less structured, allowing me to bend it into flowing, less angular shapes.